Older school-aged kids will practice their drawing speed in this fun project. Our basic techniques can easily be used at home or in the classroom.
Using a Timer in Art
I often find students (and myself) spending a large amount of time sketching, planning, erasing and redrawing details as they seek perfection in a project. Today’s activity helps artists push through this creative procrastination and forces us to focus on portions of the drawing that are vital to the design. We’re also working on hand-eye coordination as we spend less time looking at our page while drawing quickly. The timer allows us to see just how fast we create a basic outline on our page, which in turn allows us more time to focus on more creative aspects of the project.
Related: Brush up on your Shading Techniques with our free printable.
Supplies Needed to Make a Timed Drawing Art Project

- Paper – 2 Pages
- Drawing Tool – Pencil or Pen
- Timer
- An Item to Draw – Flowers, Toys, Picture of an Animal, Art Supplies, etc.
Directions to Make a Timed Drawing
Step 1

First, hold one page horizontally, fold in half. Crease and unfold.
Step 2

Next, holding the page vertically, fold the paper in half. Crease and unfold. The page should now be divided into 4 sections.
Step 3

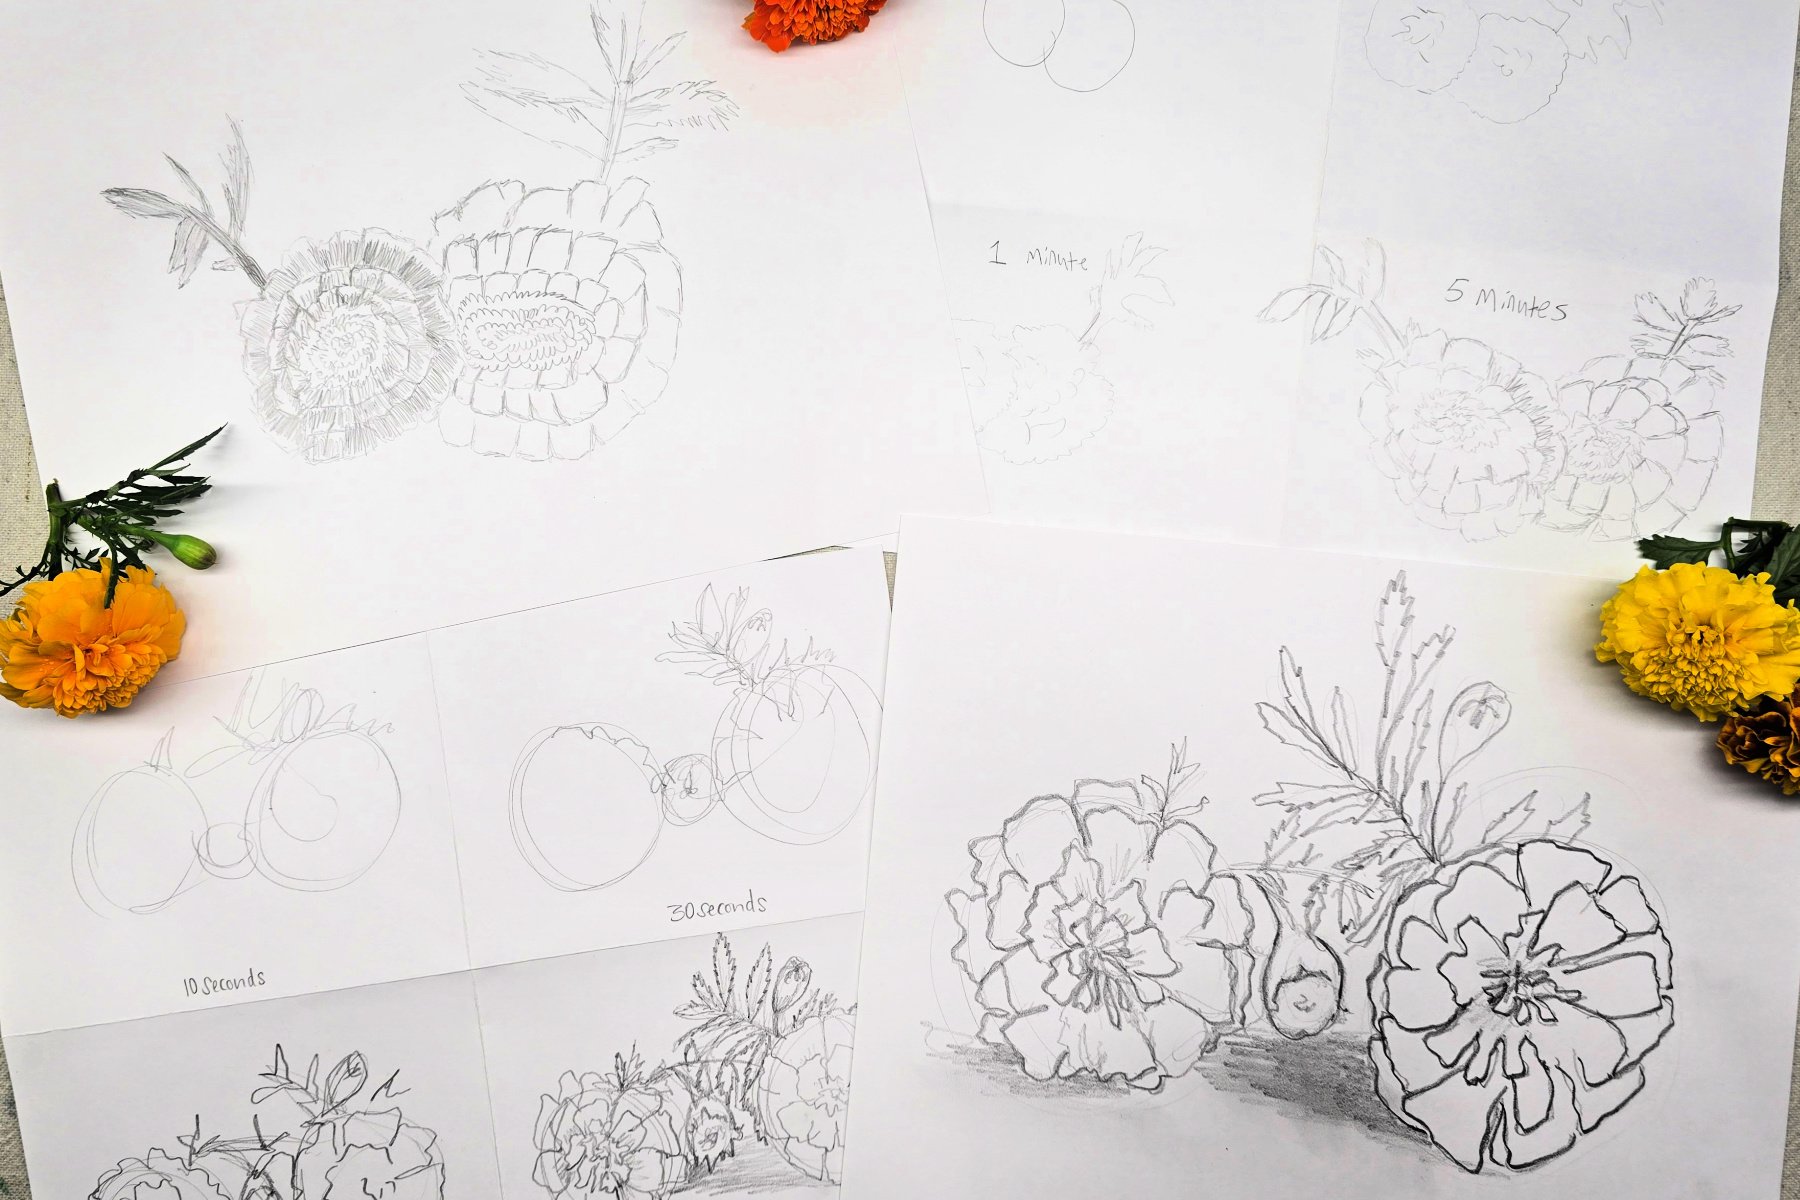
Then, label sections of page based on time limits for each drawing exercise. We chose 10 seconds, 30 seconds, 1 minute, and 5 minute sessions.
Step 4

After each section is labeled, use a timer to complete the same drawing for chosen time allotments. Draw the same image for each section, focusing on completing as much of a sketch as possible for that time limit.
- 10 Seconds: Simply encourage the kids to create a basic shape and placement for the drawing. There won’t be time to add details in this section. For example, if drawing flowers, kids may only get circles drawn for the flower or lines for stems.
- 30 Seconds – 5 Minutes: Again, emphasize general shape and placement, letting kids know they can begin to add details as time allows. Encourage kids to draw the entire time limit, even if they feel the sketch is complete, more details or shading can usually be added.
Step 5

Finally, set the timer for an extended period of time (we chose 10 minutes) and complete a more detailed full page drawing.
Finished Timed Drawing Art Project

I love this activity! Though these projects are practice-based, they can still be wall-worthy! Since these drawings are made on paper, you can easily frame, clip, or display in your preferred style.
Our Experience Making this Timed Drawing Art Project
I see great value in this project and tend to repeat it yearly with my students as a warm up exercise before sketching a detailed image. Also, we always have a good laugh when I let students know they have mere seconds to draw what it set in front of them. By the time the class is through, the kids are beyond comfortable drawing the object and may even find the longer lengths of time a bit much.
Prep Time
5 minutes
Active Time
25 minutes
Total Time
30 minutes
Difficulty
Medium
Estimated Cost
$1
Tools
- Drawing Tool – Pencil or Pen
- Timer
- An Item to Draw – Flowers, Toys, Picture of an Animal, Art Supplies, etc.
Instructions
- Hold one page horizontally, fold in half. Crease and unfold.
- Hold the page vertically and fold the paper in half. Crease and unfold. The page should now be divided into 4 sections.
- Label sections of page based on time limits for each drawing exercise. We chose 10 seconds, 30 seconds, 1 minute, and 5 minute sessions.
- After each section is labeled, use a timer to complete the same drawing for chosen time allotments. Draw the same image for each section, focusing on completing as much of a sketch as possible for that time limit.
- 10 Seconds: Simply encourage the kids to create a basic shape and placement for the drawing. There won’t be time to add details in this section. For example, if drawing flowers, kids may only get circles drawn for the flower or lines for stems.
- 30 Seconds – 5 Minutes: Again, emphasize general shape and placement, letting kids know they can begin to add details as time allows. Encourage kids to draw the entire time limit, even if they feel the sketch is complete, more details or shading can usually be added.
Notes
Timed Drawing Art Variations
- Choose complexity of objects based on skill of the child.
- Change drawing times to fit your kids and schedule.
- Use this activity as a warm-up activity before creating a more detailed work of art.
- Use seasonal or holiday decorations.
- Use colored pencils, paints, etc. to add color to your final sketch.
Other Fun Art Projects from Kids Activities Blog
Did your kids enjoy using a timer while drawing? What did they choose to draw?